User Interface
Viewport Renderer Menu
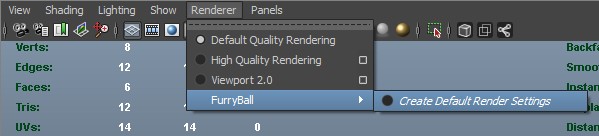
If you have successfully loaded FurryBall plugin a menu item will appear in the viewport renderer menu. To start rendering using FurryBall select the new menu item and choose one of the Render Settings Nodes listed. If your scene has no Render Settings Nodes yet there will be a 'Create Default Render Settings' option which will create and activate a default render settings node. Active render settings node is linked to FurryBall renderer so you can control your renderer output by adjusting the node's attributes in Attribute Editor, see Render Settings Node section for details.
Activating render settings node
When you create a new default render settings node from the renderer menu this node is selected and activated, this means that parameters for the renderer are read from this node (see Render Settings Node section). Render settings node can also be selected and/or activated using Render Nodes Manager (see below).
FurryBall Menu
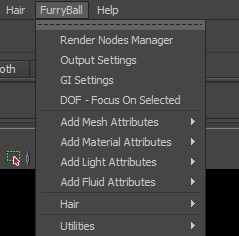
Right after you successfully load FurryBall plugin main FurryBall menu appears. Using this menu you can open Render Nodes Manager, adjust various settings, create other settings for several types of nodes or create hair.
Render Nodes Manager
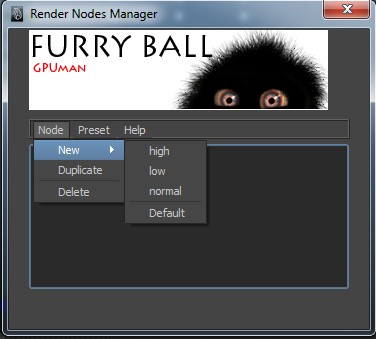
Select Render Nodes Manager from the main FurryBall menu, Render Nodes Manager window will appear.
Render Nodes Manager and Render Settings Nodes in general can be a very useful feature, you can create new nodes from previously saved presets, duplicate or delete, select and/or activate them.
There is a list of render settings nodes in the main part of the window. The list contains all render settings nodes in current scene (including referenced or imported scenes).
Activating render settings node from Render Nodes Manager
Single click to select a node, double click to activate it.
Creating new render settings node
Select 'Node -> New' from Render Nodes Manager menu, a list with presets will appear, select preset you want to create your new node from. New node will be selected (not activated), you can rename it or change parameters using Maya interface and then activate it if you want.
Render settings node presets
When you create a render settings node it is added to scene and saved with other scene data. When you open that scene on another computer with FurryBall installed all your render settings nodes are there.
But what if you want to use your render settings node in another scene? There are two similar (not the same) solutions, you can simply use Maya node preset feature (see Maya documentation) but this saves the preset only for your Maya installation. To save a render settings node preset to a file which you can distribute to any other Maya installation with FurryBall simply select 'Preset -> Save As Preset' and type a name for it. Preset file will be saved to a 'resources\renderNodePresets' subdirectory where you installed FurryBall. To delete a preset delete the file physically from that directory or select 'Preset -> Delete Preset'.
ADVANCED TIP
Don't be afraid to use all the features and possibilities of the render settings nodes system. Create several render settings nodes (or presets) for every scene you work with. Create render settings node set exactly for a specific part of your production pipeline (models creating, texturing, animations etc.) or for every output rendering pass.
Render settings node can be activated also using MEL command
furryBallSetRenderNode #nodeName#
Why not to create preview and normal render settings nodes with low and high render quality settings and bind two commands to a key shortcut. One that activates preview mode and the other one to activate normal quality mode, now you can switch between them using a simple key shortcut.
Output Settings
Select Output Settings from the main FurryBall menu, default Output Settings Node (Output node) will be selected. Output nodes are another important part of render settings node system. Output nodes tell the renderer what should be rendered (frames range and camera), what render profile(s) should be applied (render settings node) and where to save the results (path and filename). See Output Settings Node section for more details about its features.
GI Settings
To adjust global illumination settings select GI Settings from the main FurryBall menu, global GI Settings Node will be selected. GI effects like ambient occlusion and color bleeding are still enabled/disabled in render settings node, GI node is meant only for more advanced tuning of these effects. See GI Settings Node section for more details.
DOF - Focus On Selected
Selecting this menu item runs a script that simply creates a locator in the center of selected object(s) and uses its distance from camera as Focus Distance (in Depth of Field section of Maya's camera shape attributes). When using depth of field effect the camera is always focused on the locator, ie. the selected object(s). The script uses standard Maya node connections and is therefore usable for any other renderer or feature that uses the Focus Distance attribute.
Hair Menu
Select Hair -> Create Hair to create hair systems for selected objects with default settings. Use Connect To Follicles to attach FurryBall hair system to an existing Maya hair system with follicles. Using Add Hair Attributes works similar to other settings nodes, it allows one to use single hair settings for multiple hair systems. See Hair System section for more details about creating and using hair system.
Utilities Menu
Create Shelf creates a set of buttons in a new shelf with quick access to Render Nodes Manager, Output Settings, active render node and other useful things.
OTHER SETTINGS NODES
There is a huge number of attributes of particular nodes in Maya. Some of these attributes are essential for rendering with FurryBall. Most of basic shape, material, light or camera attributes are fully supported by FurryBall and Maya user can use these as he is used to. There are however other attributes used only by FurryBall renderer for some effects whose parameters are not used by other renderers or plugins. These special (other) attributes are always grouped together forming a setting node in the same fashion as render setting nodes or output settings nodes. Other settings nodes do not replace attributes of Maya nodes, they add new ones instead, ie. Maya attributes are still used in the same way whether or not other settings node is attached.
Other FurryBall settings nodes are directly connected to these types of Maya nodes:
Mesh |
Mesh Settings Node |
Material |
Material Settings Node |
Ambient Light |
Light Settings Node |
Directional Light |
|
Point Light |
|
Spot Light |
|
Fluid |
Fluid Settings Node |
See appropriate sections for more details about these FurryBall settings nodes.

There is no settings node attached to a mesh, material, light or fluid by default. In this case FurryBall renders these nodes with default settings for special features, mostly this means that special features like reflections, refractions, variable penumbra shadows and other are disabled. To enable and adjust special features user has to attach appropriate settings node.
Attaching a settings node
There is an important thing to know about other settings nodes, one settings node can be attached to multiple Maya nodes of the same type, ie. mesh node to meshes, light node to lights etc. To attach a settings node to Maya node, just select node or nodes you want the settings node to be attached to and select 'Add Mesh Attributes', 'Add Material Attributes' or 'Add Light Attributes' submenu. This submenu has always a 'New' menu item and a list of existing settings node of this type, so you can create and attach a new settings node or attach an existing one that is already used elsewhere.
If more nodes of various types are selected the settings node is added to all nodes of corresponding type in the selection. To add a material node it is enough to select a mesh that has a material assigned, ie. selecting a mesh and adding a material node will add the material node to the mesh's material (all materials if there are more components).
Detaching a settings node
Detaching a settings node can be done in almost the same way as attaching, the only difference is you select 'None' instead of new or existing settings node.
Selecting a settings node
Just select a node with settings node attached and the settings node tab will appear in the Attribute Editor. This is can be a bit more complicated for material nodes when selecting by a mesh as they are not directly attached to a mesh but to a shading group instead. To select a material node by mesh, select the mesh, select its material tab in Attribute Editor and click Select in the lower part of Attribute Editor, now the material node appears in its own tab. This is the same as if you selected the material in Hypershade which is a better way to select a material node.
To select a settings node without knowing what node it is attached to or if it has no attached nodes at all, simply deselect everything (click into empty space in viewport) and select the settings node using 'Add ### Attributes' from the menu as if you attached the settings node.
Duplicating or deleting a settings node
Select the settings node you want to delete or duplicate, follow the instructions above. Select the settings node tab in Attribute Editor and click Select in the lower part of Attribute Editor to be sure the settings node is selected as primary (ie. it is in the first tab of Attribute Editor). Now just press delete to delete it or CTRL-D to duplicate.
The FurryBall shelf provides quick access to the most used features:

Copyright © 2009-2011, Art And Animation studio
Created with the Freeware Edition of HelpNDoc: Easily create PDF Help documents